The Easy Way to set DNS settings
This is the quick and easy way I wish was available to me the first time I tried to link to an Amazon EC2 instance. Most Domain Name Registration services will have their own service to update the DNS records, and will allow you to update the details for your domain name.
Log into the website that you registered your domain name from. There should be a section dedicated to DNS settings. Go to that section. If there is the option to either modify, or add a DNS field labelled Type A, then you are in luck! You will be up an running in a few more minutes, and can continue reading this section of the tutorial. However, if the only fields it allows you to edit are ones of type NS (eg NS1, and NS2), then it will involve a bit more work (and a potentially long waiting period). If this is the situation you are in, then you will need to skip this section of the tutorial and go to the next one.
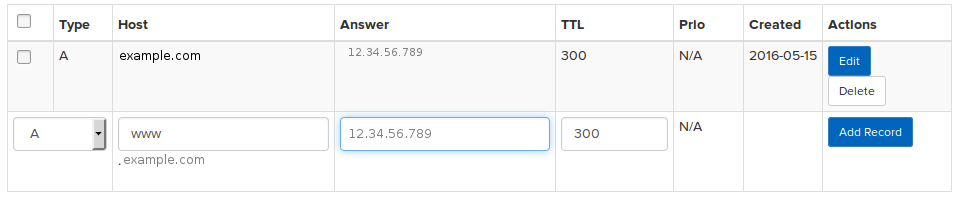
Ok, so if you are still reading, then I am assuming you have the option to edit or add a DNS field of type A. When editing this record, there should be several sub-fields to edit:
- Host: This should be set to your plain domain
example.com(If you are
with godaddy you will need to have@.example.com) - Answer or Points to or Value: here you paste the IP address of your EC2 instance.
- TTL: This controls how often (in seconds) a DNS server (or your browser) is allowed to cache this record for before refreshing. You can leave this to whatever the default is. Or if there is no default, then enter your own (the values 300 and 600 are quite common).
Below is an example of what the edit screen for field of type A might look like.
Once you update that field, you will create yet another one of type A if
you want people to access your website using the www prefix (eg
www.example.com). Note that if it does not allow you to add another one of
type A (as is the case with Godaddy), then you will need to add/edit one of
type CNAME. The subfields should be the same, but this time adding www to
the hostname so it looks like www.example.com. Again, add the IP address to
your EC2 instance in the relevant field (if you are using Godaddy, you will
need to use @ instead)
Once you have saved those changes, you are done! Thats it! There is no need for you to continue with any of the other sections of this tutorial. All you have to do is wait a little bit for the cached entries in DNS servers to refresh.
You can monitor if the changes have occured using the command line tool dig
(which should be installed by default on an ubuntu machine). Type:
dig example.com
And if you spot the IP address of your EC2 instance on there, then you know it is ready to route traffic to your site :)